The allure of a perfectly cooked New York steak is undeniable. Its rich marbling, robust flavor, and satisfying chew make it a favorite among steak aficionados. However, achieving that melt-in-your-mouth tenderness can sometimes feel like an elusive art form. Whether you’re a seasoned home cook or embarking on your culinary journey, understanding the nuances of preparing a tender New York steak is key to elevating your dining experience. This guide aims to unlock those secrets, transforming your New York steaks from merely good to absolutely spectacular, comparable to the finest dining establishments you might encounter on your travels, from the bustling streets of New York City to the charming bistros of Paris.
The Foundation of Tenderness: Selecting Your Steak
Before even thinking about heat or seasonings, the journey to a tender New York steak begins with its selection. The quality of the meat itself is paramount, and just as choosing the right hotel can significantly impact your stay, choosing the right cut will dictate the outcome of your dish.
Understanding the Cut: What Makes a New York Steak Unique?
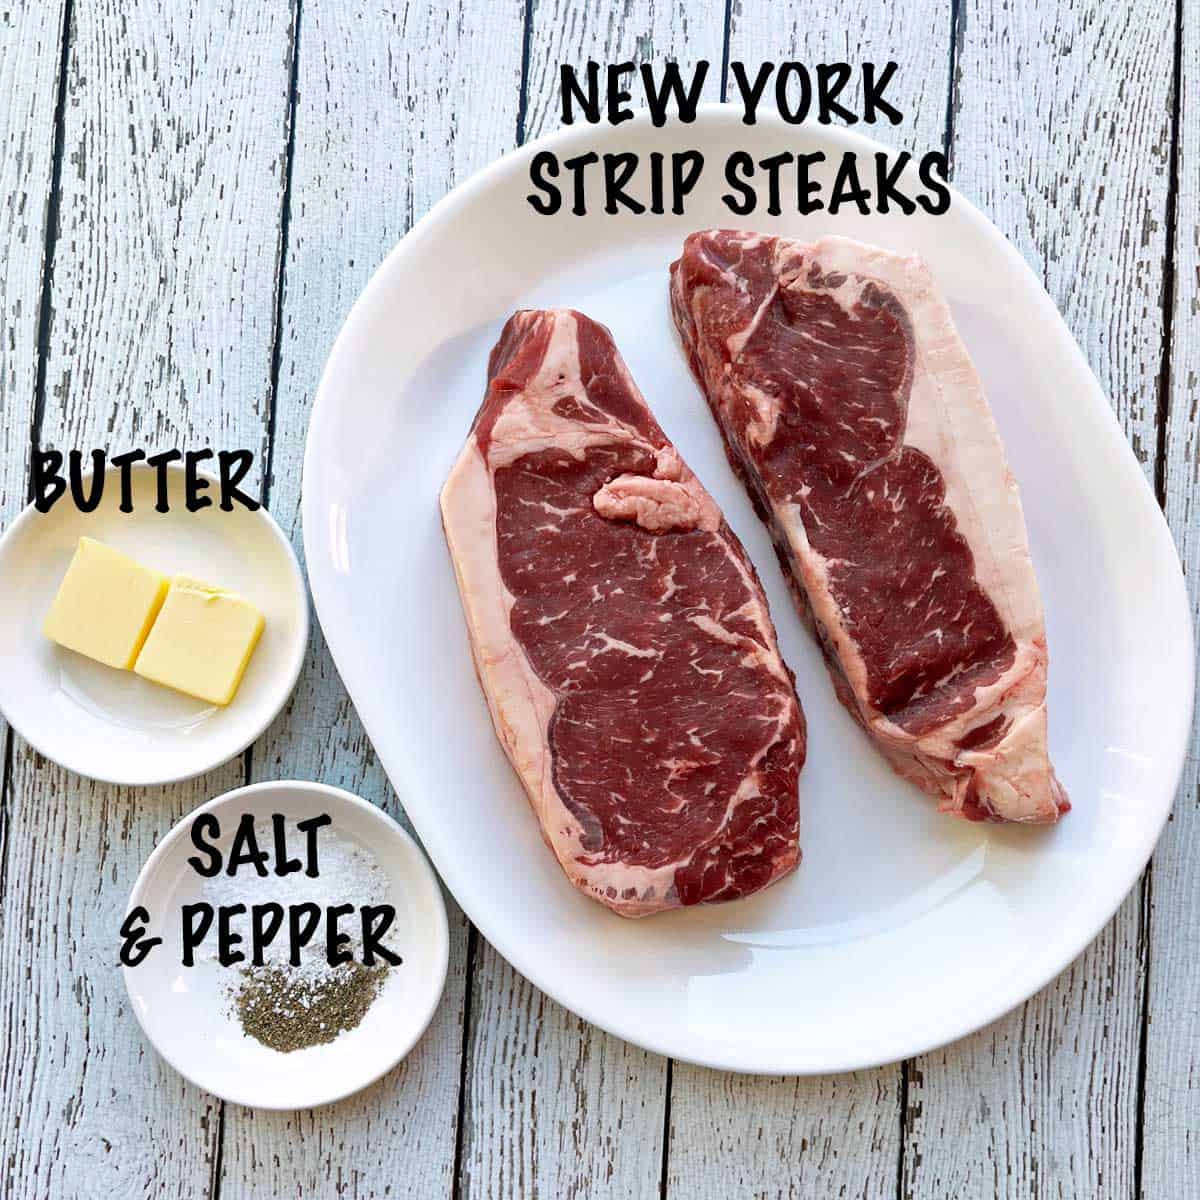
The New York strip steak, also known as the Kansas City strip, strip loin, or just strip, is a well-loved cut for its balanced flavor and texture. It comes from the short loin primal cut, specifically the tenderloin’s adjacent section. This muscle is less worked than those in the cow’s legs or shoulders, contributing to its inherent tenderness. However, variations within this cut can still lead to differences in tenderness.
The Importance of Marbling
Marbling refers to the flecks of intramuscular fat distributed throughout the muscle. These seemingly small details are crucial. During cooking, this fat renders, basting the steak from within and adding moisture, flavor, and, most importantly, tenderness. A well-marbled New York steak will cook more evenly and remain more succulent than a leaner cut. Look for steaks with fine, evenly distributed white flecks of fat. Avoid steaks with large, thick chunks of fat, as these can sometimes be unpleasantly chewy.
Grade Matters: Prime, Choice, and Select
In the United States, beef is graded by the USDA based on marbling and maturity.
- Prime: This is the highest grade, boasting abundant marbling, which translates to exceptional tenderness, juiciness, and flavor. Prime steaks are often found in high-end steakhouses and specialty butcher shops.
- Choice: This is the most common grade found in supermarkets and offers a good balance of quality and value. Choice steaks are still tender and flavorful, though they may have slightly less marbling than Prime.
- Select: This grade has less marbling and can be less tender and juicy than Prime or Choice. While still edible, it requires more attention to cooking techniques to achieve optimal tenderness.
When purchasing your New York steak, opting for Prime or Choice will give you a significant head start in achieving tenderness. If you’re working with a Select grade, employing more advanced tenderizing techniques becomes even more critical. Consider where you source your meat. A reputable butcher, much like a well-regarded hotel concierge who can offer local insights, can often guide you toward the best cuts.
Thickness: A Factor in Cooking Success
The thickness of your New York steak also plays a role in its tenderness. Steaks that are at least 1 to 1.5 inches thick are ideal. Thicker cuts allow for a greater sear on the outside while keeping the interior at your desired temperature, preventing overcooking. Overcooked steak, regardless of its initial quality, will inevitably be tough. A thicker steak provides a more forgiving window for achieving that perfect medium-rare or medium.
Mastering the Art of Tenderization: Techniques Beyond the Basics
Once you have a quality steak, the next step is to employ techniques that enhance its natural tenderness. These methods are akin to exploring the hidden gems of a destination, adding layers of discovery to your culinary journey.
Dry Aging: The Connoisseur’s Choice
While not a technique for home cooks to perform themselves without significant investment and expertise, understanding dry aging is crucial for appreciating steakhouse quality. Dry aging involves storing beef in a controlled, refrigerated environment for an extended period, typically 10 days to several weeks. During this time, several things happen:
- Moisture Evaporation: Water content decreases, concentrating the beef’s flavor.
- Enzymatic Action: Natural enzymes within the meat break down muscle fibers, leading to increased tenderness.
- Oxidation: The surface of the meat dries and forms a crust, which is then trimmed away, further enhancing flavor and texture.
Dry-aged steaks possess a distinct, nutty flavor and unparalleled tenderness. Many premium steakhouses, like Peter Luger Steak House in Brooklyn, are renowned for their dry-aged selections. When purchasing, look for steaks explicitly labeled as dry-aged.
Wet Aging: A More Common Approach
Wet aging is the more common method used by packers and involves vacuum-sealing beef and allowing it to age for several days to a few weeks. The vacuum seal prevents moisture loss and bacterial contamination, while enzymes still work to tenderize the meat. While not as intensely flavored as dry-aged beef, wet aging still contributes significantly to tenderness. Most commercially available steaks have undergone some form of wet aging.
Marinades: Adding Moisture and Enzymes
For those looking to tenderize a steak at home, marinades can be a valuable tool. A good marinade typically includes an acidic component, an oil, and flavorings.
- Acids: Ingredients like citrus juice (lemon, lime), vinegar, or buttermilk contain enzymes that help break down tough muscle fibers. Use these judiciously, as over-marinating can turn the steak mushy. Marinate for no more than a few hours for tender cuts like New York strip.
- Oils: Olive oil or vegetable oil helps distribute the marinade’s flavors and can add a bit of moisture.
- Flavorings: Herbs, spices, garlic, and onions add depth and complexity to the steak’s taste.
Example Marinade for New York Steak:
- 1/4 cup olive oil
- 2 tablespoons balsamic vinegar
- 2 cloves garlic, minced
- 1 tablespoon chopped fresh rosemary
- Salt and freshly ground black pepper to taste
Combine all ingredients and marinate the New York steak for 30 minutes to 2 hours in the refrigerator. Always discard used marinades.
Mechanical Tenderization: The Direct Approach
While less sophisticated, mechanical tenderization can also be effective, especially for leaner or tougher cuts. This involves physically breaking down the muscle fibers.
- Meat Mallet/Tenderizer: Using the spiked side of a meat mallet or a dedicated tenderizing tool, gently but firmly pound the surface of the steak. Do this on both sides, being careful not to pulverize the meat. This method is more common for cuts like flank steak or round steak but can be used cautiously on New York strip if it’s on the leaner side.
- Scoring: For some tougher cuts, making shallow cross-hatch scores on the surface can help. However, for a New York strip, this is generally unnecessary and can lead to excess moisture loss.
The Role of Salt: Dry Brining
Salt is more than just a flavor enhancer; it plays a crucial role in tenderizing meat. Dry brining is a simple yet incredibly effective technique. It involves generously salting the steak and letting it rest in the refrigerator for at least 40 minutes, or ideally, for several hours or even overnight.
Here’s how it works:
- Moisture Extraction: Salt draws out moisture from the surface of the steak.
- Reabsorption and Dissolving: As the salt draws out moisture, it also begins to dissolve into that moisture, creating a brine. This brine is then reabsorbed back into the meat.
- Enzymatic Action: The salt helps to break down muscle proteins, much like an enzymatic marinade but without the risk of mushiness.
- Moisture Retention: By the time the steak hits the heat, the salt has rehydrated the meat, and the protein structure is altered, allowing the steak to retain more of its natural juices during cooking.
Dry Brining Process:
- Pat your New York steak completely dry with paper towels.
- Generously season all sides with kosher salt (about 1 teaspoon per pound of meat).
- Place the steak on a wire rack set over a baking sheet, uncovered, in the refrigerator.
- Allow it to rest for at least 40 minutes. For optimal results, brine overnight.
- Before cooking, do not rinse. Pat dry again if any surface moisture has reappeared.
Dry brining is a favorite among many chefs for its ability to improve both tenderness and flavor without altering the steak’s natural texture. It’s a subtle yet powerful technique, much like discovering a hidden local eatery that offers an authentic experience.
The Cooking Process: Heat, Rest, and Slicing
The final stage in ensuring a tender New York steak involves the actual cooking process, the resting period, and how you slice the finished product. This is where your careful preparation comes to fruition, much like a well-planned itinerary culminates in a memorable trip.
High Heat Sear: Building Flavor and Sealing Juices
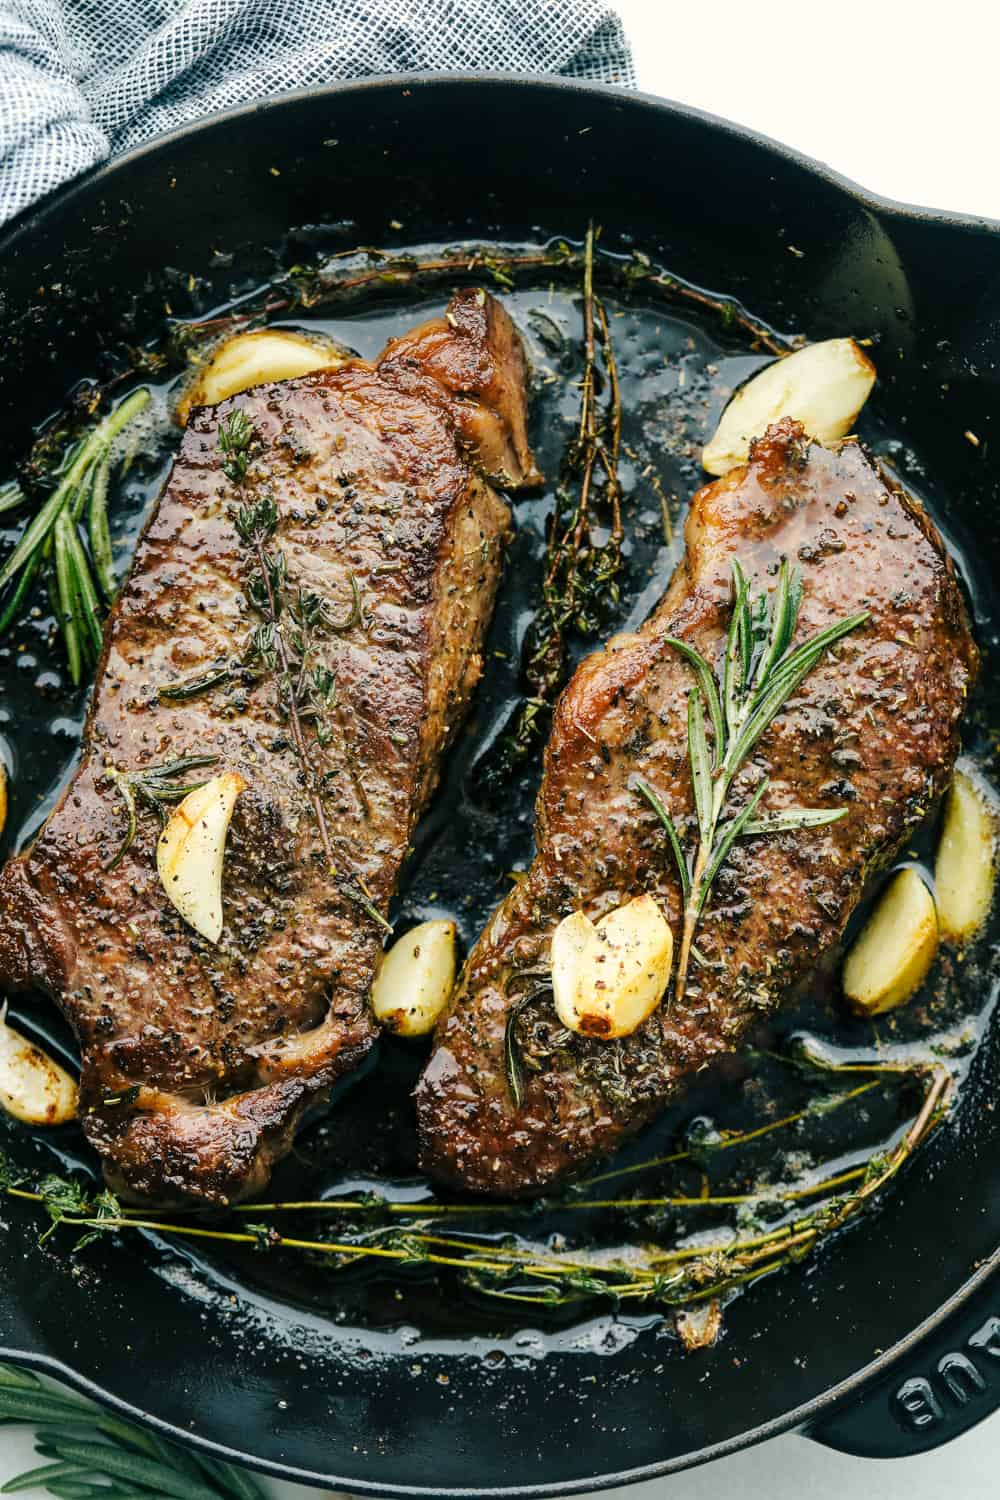
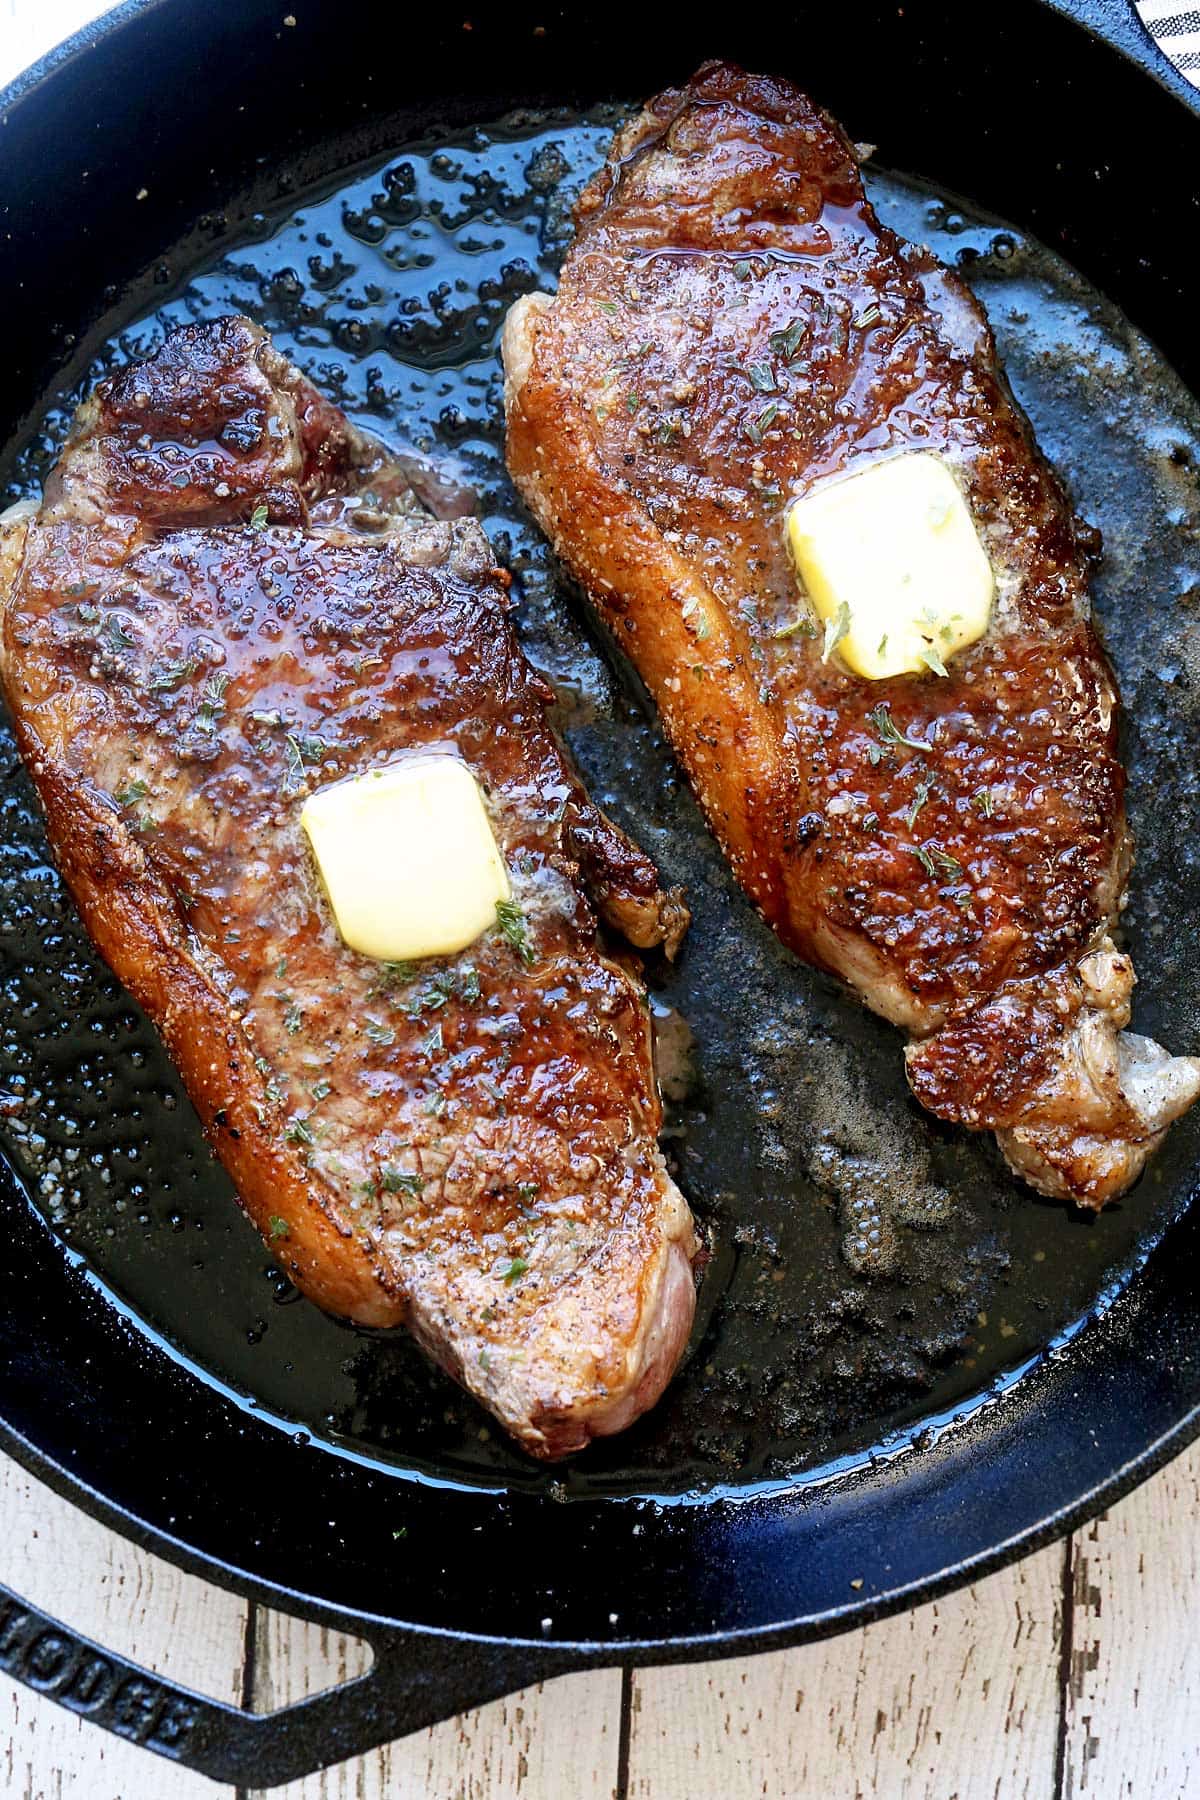
The key to cooking a tender New York steak is to cook it hot and fast. This achieves a beautiful crust (the Maillard reaction) while keeping the interior tender.
- Pan-Searing: A cast-iron skillet is ideal for pan-searing. Get the skillet screaming hot before adding your steak. Use a high-smoke-point oil like canola, grapeseed, or avocado oil. Sear each side for 2-4 minutes, depending on thickness, until a rich brown crust forms.
- Grilling: Grilling over high, direct heat also works wonderfully. Ensure your grill grates are clean and well-oiled. Grill for 2-4 minutes per side for medium-rare.
Oven Finishing (Reverse Sear or Sear then Oven)
For thicker steaks, especially those over 1.5 inches, finishing in the oven after an initial sear can ensure even cooking.
- Reverse Sear: This method starts with low oven heat (around 225-250°F or 107-120°C) until the steak reaches about 10-15°F below your desired final temperature. Then, sear in a very hot pan or on a grill for a final crust. This method offers excellent control over doneness and results in very tender steak.
- Sear then Oven: Sear the steak on both sides in a very hot pan, then transfer the skillet to a preheated oven (around 400-425°F or 200-220°C) to finish cooking.
The Crucial Resting Period
This is arguably the most overlooked step in achieving tenderness. After cooking, allow your New York steak to rest for at least 5-10 minutes (for thinner steaks) to 10-15 minutes (for thicker steaks) before slicing.
During cooking, the muscle fibers tighten, and the juices are pushed towards the center. Resting allows these fibers to relax and the juices to redistribute throughout the steak. If you slice into it immediately, all those delicious juices will run out onto your cutting board, leaving you with a drier, less tender steak. Tent it loosely with foil to keep it warm. This is like allowing yourself time to unwind after a long day of sightseeing; it’s essential for the experience.
Proper Slicing Technique
How you slice your steak also impacts perceived tenderness. Always slice against the grain. The grain refers to the direction in which the muscle fibers are aligned. By cutting perpendicular to these fibers, you shorten them, making the steak much easier to chew and therefore more tender. Look closely at the steak’s surface to identify the direction of the grain, then make your slices against it.
By following these steps, from careful selection to thoughtful preparation and patient execution, you can consistently achieve a New York steak that is incredibly tender, flavorful, and satisfying. This culinary skill will undoubtedly impress, whether you’re serving it at a special dinner at home or sharing it with friends after a day exploring the wonders of a new city, perhaps after a day of visiting landmarks like the Statue of Liberty or enjoying the vibrant atmosphere of Times Square. Your steak will be as memorable as your travels.
LifeOutOfTheBox is a participant in the Amazon Services LLC Associates Program, an affiliate advertising program designed to provide a means for sites to earn advertising fees by advertising and linking to Amazon.com. Amazon, the Amazon logo, AmazonSupply, and the AmazonSupply logo are trademarks of Amazon.com, Inc. or its affiliates. As an Amazon Associate we earn affiliate commissions from qualifying purchases.