The allure of Baked Alaska is undeniable. This showstopper dessert, with its dramatic meringue shell encasing a frozen core, is as much a feast for the eyes as it is for the palate. Often seen gracing the menus of fine dining establishments or as a triumphant finale to celebratory meals, its seemingly complex presentation belies a surprisingly achievable preparation, even for home cooks. While its origins are debated, its place as a beloved, theatrical dessert is secure. This guide will demystify the process, transforming you into a culinary architect capable of crafting this frozen marvel, and perhaps even inspiring a desire to explore the very places that might inspire such edible art.
The essence of Baked Alaska lies in its paradoxical nature: a hot, torched exterior protecting a supremely cold interior. This contrast is not just a culinary trick; it’s a celebration of temperature and texture, a playful dance that delights the senses.
The Anatomy of a Triumph: Deconstructing Baked Alaska
Before we embark on the journey of creation, it’s essential to understand the fundamental components that make up this iconic dessert. Each element plays a crucial role, contributing to the overall success and spectacular presentation.
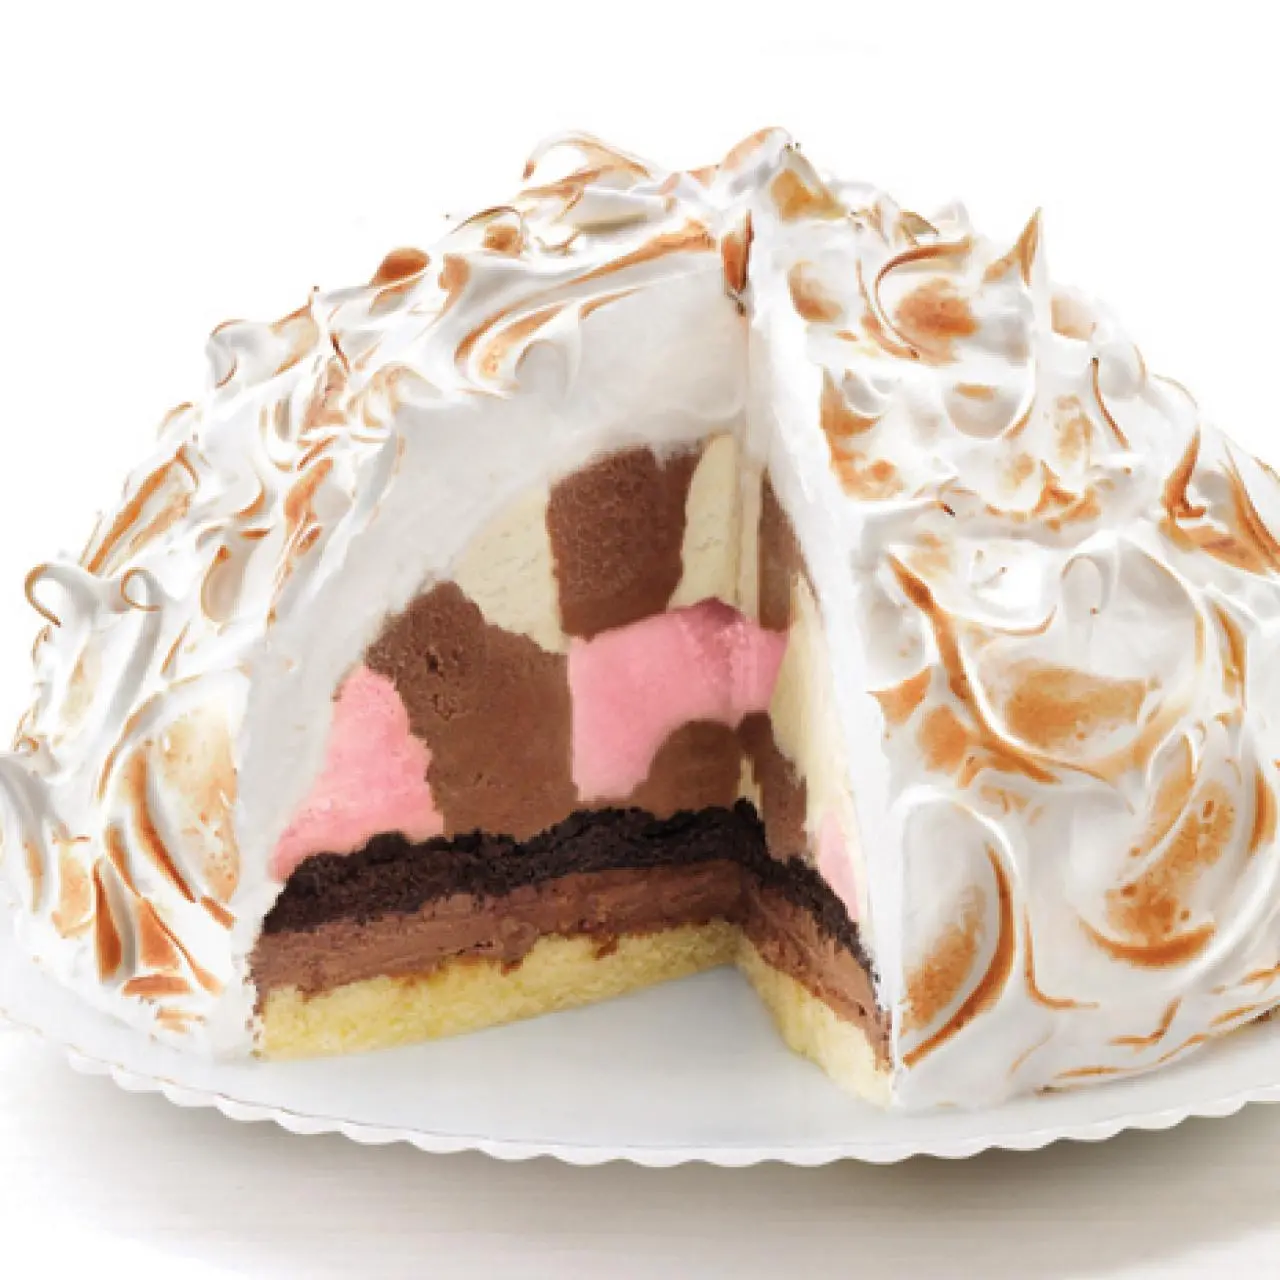
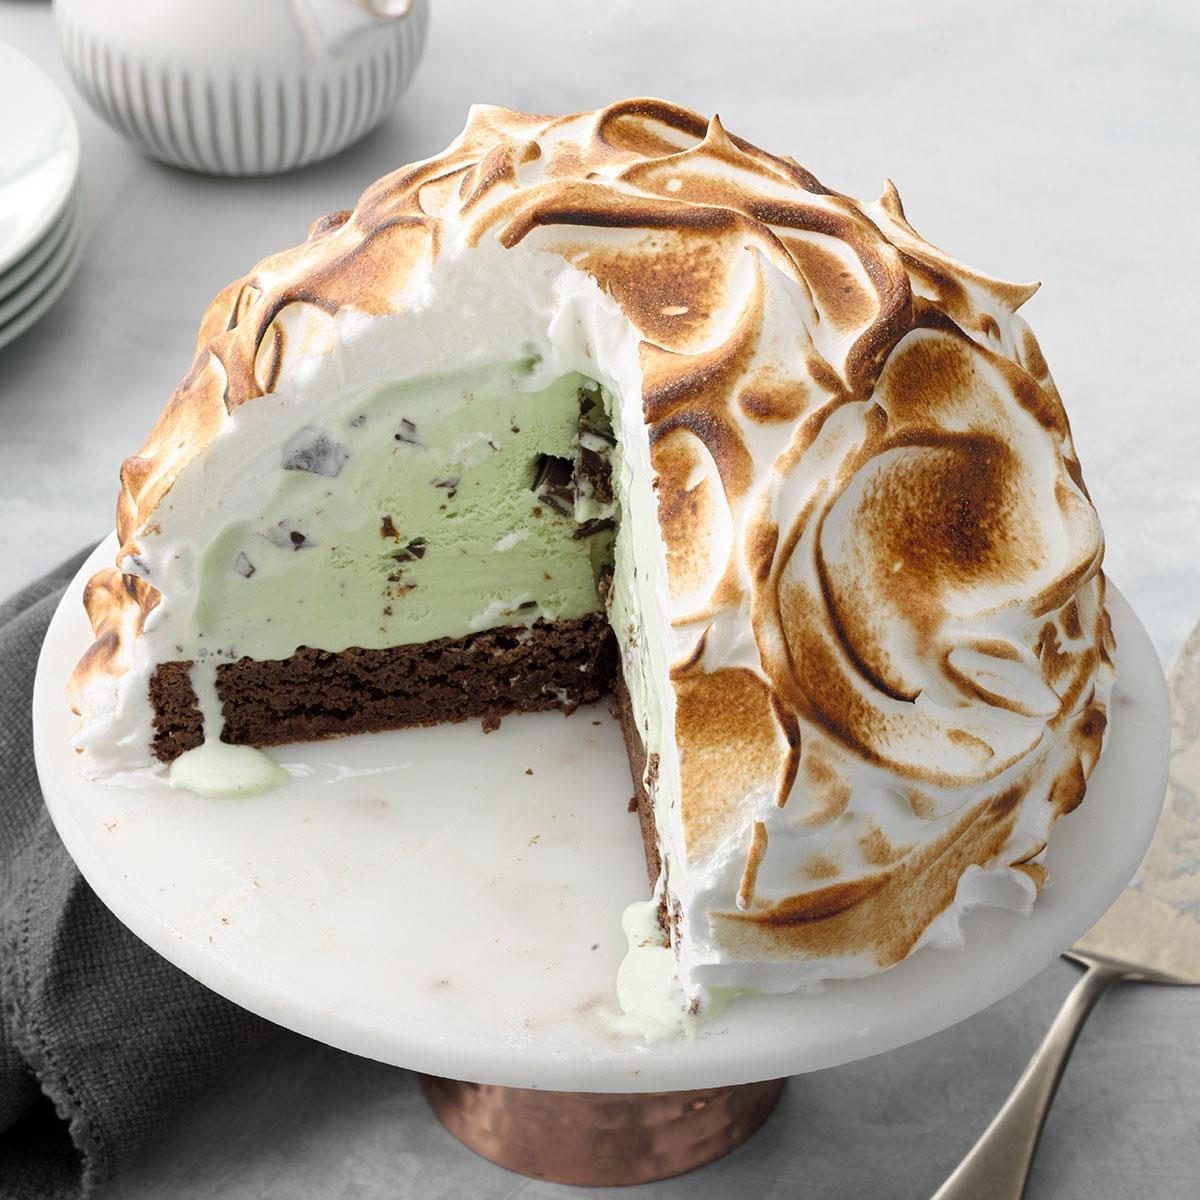
The Frozen Heart: Ice Cream and Cake Foundation
At its core, Baked Alaska is built upon a foundation of delicious frozen delight.
Choosing Your Ice Cream
The selection of ice cream is your first creative liberty. While classic vanilla is a time-honored choice, offering a pure, sweet canvas, the possibilities are vast. Think about complementary flavors that will enhance the overall experience. A rich chocolate ice cream can provide a decadent counterpoint, while fruit-infused varieties like raspberry or strawberry can add a refreshing tartness. For a more adventurous palate, consider flavors like pistachio, coffee, or even salted caramel.
The key is to select an ice cream that is firm and holds its shape well. Avoid very soft-serve or highly aerated ice creams, as they may melt too quickly during the assembly and baking process. If you’re feeling particularly ambitious, consider making your own artisanal ice cream, allowing you complete control over the flavor profile and richness. This could be a delightful culinary exploration, perhaps inspired by flavors you’ve encountered during your travels. Imagine a Kyoto matcha ice cream, or a vibrant mango sorbet reminiscent of a tropical getaway.
The Cake Base
Beneath the ice cream sits a layer of cake. This serves as both a structural element and an additional textural component. The traditional choice is a thin sponge cake, often a genoise. Its lightness and slightly porous texture absorb any minor condensation from the ice cream without becoming soggy. A simple yellow or vanilla sponge cake is ideal, as it won’t overpower the other flavors.
Alternatively, you could opt for a chocolate cake, a butter cake, or even a génoise flavored with citrus zest. The thickness of the cake layer is important – it should be substantial enough to support the ice cream and meringue but not so thick that it becomes a dominant element. You’ll want to cut the cake into a shape that mirrors the desired form of your final dessert – typically a circle or an oval. Ensure the cake is completely cooled before assembly.
The Protective Shield: Meringue Mastery
The meringue is arguably the most visually striking element of Baked Alaska. It acts as an insulating layer, protecting the ice cream from the heat of the oven, and upon torching, it develops a beautifully browned, caramelized exterior. There are two main types of meringue commonly used for Baked Alaska:
Swiss Meringue
This is a popular choice due to its stability and glossy appearance. To make a Swiss meringue, egg whites and granulated sugar are gently heated over a double boiler, whisking constantly until the sugar is dissolved and the mixture is warm to the touch. This process pasteurizes the egg whites, making it a safer option. Once heated, the mixture is transferred to a stand mixer (or whisked vigorously by hand) until stiff, glossy peaks form. The meringue is then folded in, creating a smooth, pliable coating.
Italian Meringue
Italian meringue involves pouring a hot sugar syrup into whipping egg whites. This method also results in a very stable and glossy meringue. The sugar syrup is cooked to a specific temperature, and its addition to the egg whites cooks them, creating a similar pasteurization effect to the Swiss method. Italian meringue is known for its incredibly smooth texture.
Regardless of the method chosen, the meringue must be applied generously and evenly, completely encasing the ice cream and cake. Ensure there are no gaps or thin spots, as these will allow heat to penetrate and melt the ice cream. The meringue can be swirled decoratively or smoothed for a more elegant finish.
The Fiery Finale: The Baking and Browning
This is where the magic happens. The goal is to lightly brown the meringue without melting the ice cream within.
The Oven’s Role
The oven for Baked Alaska is typically preheated to a high temperature, around 400-450°F (200-230°C). This intense heat is crucial for browning the meringue quickly. The dessert is usually placed on a baking sheet and then transferred to the hot oven. The baking time is exceptionally short, usually just a few minutes, enough to create a golden-brown crust. It’s a delicate balance; too long, and your ice cream will succumb to the heat; too short, and the meringue will remain pale.
The Torch’s Touch
For a more controlled browning and a restaurant-quality finish, a culinary torch is indispensable. This allows you to apply heat precisely to the meringue, creating beautiful caramelization without overcooking the interior. Move the torch continuously across the surface of the meringue, ensuring even browning. You can create intricate patterns and a professional-looking finish with a bit of practice.
Embarking on Your Culinary Adventure: Step-by-Step Creation
Now that you understand the components, let’s walk through the process of creating your own Baked Alaska. Preparation is key to success, so having all your ingredients ready and your workspace organized will make the process smoother.
Step 1: Prepare Your Foundation
- Shape Your Cake: Cut your cooled sponge cake into the desired shape (e.g., an 8-inch circle).
- Soften Your Ice Cream: Allow your chosen ice cream to soften slightly at room temperature for about 10-15 minutes. This makes it easier to spread.
- Assemble the Base: Place the cake circle on a baking sheet lined with parchment paper. Using an offset spatula, spread a generous, even layer of softened ice cream over the cake, ensuring it extends to the edges. Work quickly to prevent the ice cream from melting too much.
- Freeze: Place the cake and ice cream base in the freezer for at least 2-4 hours, or until the ice cream is completely firm. This is a critical step for ensuring the ice cream doesn’t melt during the meringue application and baking.
Step 2: Craft Your Meringue
- Prepare Your Meringue: Whisk your egg whites and sugar (using either the Swiss or Italian method) until stiff, glossy peaks form. Ensure your bowl and whisk are impeccably clean, as any trace of fat can prevent the egg whites from whipping properly.
- Apply the Meringue: Retrieve your frozen ice cream base from the freezer. Using a spatula, generously cover the entire ice cream and cake with the meringue. Make sure to seal all edges completely, creating an insulating shell. You can create decorative swirls and peaks with the back of a spoon or a spatula for an artistic touch.
Step 3: Bake and Brown to Perfection
- Preheat Your Oven: Preheat your oven to a high temperature, around 400-450°F (200-230°C).
- Bake (Optional, but Recommended for beginners): For an initial browning, you can place the assembled Baked Alaska in the preheated oven for 3-5 minutes, just until the meringue begins to turn golden. This step is optional if you’re using a torch and are confident in your torching skills.
- Torch and Brown: Remove the Baked Alaska from the oven (or directly from the freezer if skipping the initial bake). Using a culinary torch, carefully and evenly brown the meringue. Move the torch continuously to prevent scorching and to achieve a beautiful golden-brown hue. Aim for a balance of color – some areas can be darker for visual appeal, but avoid burning.
- Serve Immediately: Baked Alaska is best served immediately after torching to enjoy the dramatic temperature contrast.
Beyond the Plate: Thematic Inspirations and Perfect Pairings
While the act of making Baked Alaska is a rewarding culinary achievement, its creation can also be an inspiration for further exploration, whether through travel, dining, or lifestyle choices.
Culinary Travel and Regional Delights
The concept of a striking dessert like Baked Alaska can easily evoke thoughts of grand dining experiences encountered during travel. Imagine enjoying such a dessert at a renowned restaurant in Paris, perhaps following a day of exploring the Louvre Museum. Or consider the possibilities of a tropical-themed Baked Alaska, perhaps featuring coconut ice cream and a rum-infused cake, enjoyed on a veranda overlooking the beaches of Bali.
The choice of ice cream flavors itself can be a nod to destinations. A rich, dark chocolate ice cream might call to mind the artisanal chocolatiers of Switzerland, while a vibrant berry sorbet could transport you to the fruit-laden orchards of Italy. Each element offers a chance to weave in personal travel memories or fuel future wanderlust.
Accommodation and Lifestyle Choices
The preparation and presentation of a dessert like Baked Alaska often aligns with a lifestyle that appreciates finer things, whether that’s a luxurious hotel stay or a meticulously planned family trip.
Consider the ideal setting for serving your creation. A formal dinner party at home, perhaps after a return from a business trip to New York City, could be elevated by this impressive dessert. Or, imagine a special occasion at a luxury resort, where the staff might present a spectacular Baked Alaska as a surprise finale, perhaps after a day of exploring nearby landmarks.
For those who enjoy extended stays, perhaps in a charming villa rental in Tuscany, the process of creating a Baked Alaska could become a delightful activity, using local ingredients and sharing the experience with loved ones. It’s a dessert that embodies celebration and a commitment to creating memorable moments, whether at home or abroad.

The Art of Presentation and Experiential Dining
The visual drama of a perfectly browned Baked Alaska is a testament to the importance of presentation in culinary arts. This extends beyond the dessert itself to the entire dining experience. Think of the architectural marvels like the Eiffel Tower in Paris – their impact is amplified by their scale and design. Similarly, a well-executed Baked Alaska offers a moment of awe.
When planning a special meal, consider the ambiance. Is it a romantic dinner at a boutique hotel, like the Plaza Hotel, where a perfectly presented dessert would be par for the course? Or is it a more casual, yet still indulgent, family gathering, perhaps after a day exploring a historical site like Machu Picchu? The context in which you serve your Baked Alaska can enhance its impact.
In conclusion, making Baked Alaska is more than just a recipe; it’s an experience. It’s about mastering a technique, playing with flavors, and creating a dessert that elicits gasps of delight. It’s a journey that can spark inspiration for travel, enhance lifestyle choices, and deepen an appreciation for the art of food and hospitality. So, gather your ingredients, channel your inner pastry chef, and prepare to create a frozen masterpiece that is as thrilling to make as it is to devour.
LifeOutOfTheBox is a participant in the Amazon Services LLC Associates Program, an affiliate advertising program designed to provide a means for sites to earn advertising fees by advertising and linking to Amazon.com. Amazon, the Amazon logo, AmazonSupply, and the AmazonSupply logo are trademarks of Amazon.com, Inc. or its affiliates. As an Amazon Associate we earn affiliate commissions from qualifying purchases.