The allure of a perfectly crafted California Roll is undeniable. It’s a gateway sushi experience, a delightful introduction to the vibrant world of Japanese cuisine that has captivated palates worldwide. While the thought of preparing sushi at home might seem daunting, especially when envisioning the intricate art of rolling, the California Roll is surprisingly accessible for home cooks. This article will guide you through the process, transforming you into a sushi-rolling maestro capable of impressing friends and family with this beloved classic. We’ll delve into the essential ingredients, the precise techniques, and offer tips to ensure your California Rolls are as visually appealing as they are delicious, making your culinary adventures even more enriching.

Sushi, at its heart, is about balance and freshness. The California Roll, a distinctly Western interpretation, eschews raw fish for cooked crab meat, avocado, and cucumber, making it a universally appealing choice. Its creation is a journey into the meticulous, yet ultimately rewarding, practice of Japanese food preparation. Beyond the immediate satisfaction of eating a homemade roll, mastering this dish can unlock a deeper appreciation for Japanese culinary traditions, a key aspect of exploring local culture and food during your travels.
This guide is designed to be comprehensive, covering everything from selecting the right rice to the final presentation. Whether you’re planning a special dinner at your luxury resort or seeking a fun, hands-on activity for a family trip, learning to roll sushi is a fantastic skill. It aligns perfectly with the spirit of experiential tourism, allowing you to bring a piece of your travels back to your own kitchen. So, gather your ingredients, embrace the process, and get ready to create your own delicious California Rolls.
The Art of Preparation: Ingredients and Mise en Place
Before embarking on the rolling adventure, meticulous preparation, known as mise en place in culinary circles, is paramount. This ensures a smooth and enjoyable sushi-making experience. For the perfect California Roll, you’ll need a collection of fresh, high-quality ingredients, each playing a vital role in the final flavor profile and texture.
Essential Components for Your California Rolls
The foundation of any good California Roll lies in its carefully selected components. Don’t underestimate the impact of each ingredient; their synergy is what makes this sushi so special.
- Sushi Rice: This is the non-negotiable base. Use short-grain Japanese rice specifically labeled as sushi rice. Its sticky texture is crucial for holding the roll together. You’ll need about 1.5 cups of uncooked rice to yield enough for several rolls. Once cooked, it should be seasoned with a mixture of rice vinegar, sugar, and salt. This seasoned rice, known as sushi-meshi, provides that characteristic tangy-sweet flavor.
- Nori (Seaweed Sheets): These are dried sheets of seaweed that form the outer layer of the roll. Look for high-quality nori that is dark, crisp, and uniform in color. You’ll need about 4-5 sheets, depending on how many rolls you plan to make.
- Crab Meat: Traditionally, imitation crab meat (surimi) is used for its accessible flavor and texture. However, for a more premium experience, you can use fresh or canned crab meat, flaked. Ensure it’s well-drained if using canned.
- Avocado: Ripe avocado is key for its creamy texture and subtle sweetness. It balances the other flavors and adds a luxurious mouthfeel. You’ll need about one ripe avocado.
- Cucumber: Japanese cucumbers or English cucumbers are ideal as they have fewer seeds and a thinner skin. They provide a refreshing crunch and a slightly vegetal note.
- Optional Enhancements: While not strictly traditional, many enjoy adding a thin layer of mayonnaise (Japanese mayonnaise like Kewpie is excellent) for extra richness, or even a sprinkle of toasted sesame seeds on the outside for added texture and visual appeal.
Preparing Your Rice: The Sticky Foundation
Perfectly cooked and seasoned sushi rice is the cornerstone of excellent sushi. Rinsing the rice is a critical first step. Place the uncooked sushi rice in a bowl and cover it with cold water. Swish the rice gently with your hands, then drain the cloudy water. Repeat this process until the water runs clear, typically 4-5 times. This removes excess starch, preventing gummy rice.
Cook the rice according to package directions, usually by simmering it with a specific amount of water (often a 1:1 or 1:1.2 rice-to-water ratio). Once cooked, let it steam, covered, for about 10-15 minutes off the heat.
While the rice is steaming, prepare the sushi vinegar. In a small saucepan, gently heat rice vinegar, sugar, and salt until the sugar and salt dissolve. Do not boil. A common ratio is 4 tablespoons of rice vinegar, 2 tablespoons of sugar, and 1 teaspoon of salt for about 1.5 cups of uncooked rice.
Once the rice has steamed, transfer it to a large, shallow non-metallic bowl or a hangiri (a wooden sushi rice tub, if you have one). Drizzle the sushi vinegar evenly over the hot rice. Using a rice paddle or a flat spatula, gently cut and fold the vinegar into the rice. Fan the rice simultaneously as you mix. This helps cool it down quickly and gives it a glossy sheen. Continue fanning and folding until the rice is no longer steaming and has reached room temperature. Avoid mashing the rice; it should remain distinct grains. This careful preparation ensures your rice will be the perfect sticky, flavorful base for your rolls.
Prepping Your Fillings: The Delicate Touch
With the rice ready, it’s time to prepare your fillings. This stage requires a delicate touch to ensure the ingredients are uniformly cut and ready to be encased.
- Crab Meat: If using imitation crab sticks, remove them from their plastic wrapping. You can either shred them with your fingers or finely chop them. If using real crab meat, gently flake it, ensuring any shell fragments are removed.
- Avocado: Cut the avocado in half, remove the pit, and peel the skin. Slice the avocado into thin strips, about ¼ inch thick. A ripe avocado should yield easily to gentle pressure.
- Cucumber: Wash the cucumber thoroughly. Trim off the ends. Depending on the size and seediness, you may want to remove the seeds. You can do this by cutting the cucumber in half lengthwise and scooping out the seeds with a spoon. Then, cut the cucumber into thin, matchstick-like strips, similar in thickness to the avocado.
Having all your ingredients prepared and within easy reach is crucial for efficient rolling. This organized approach not only simplifies the process but also elevates the overall experience, much like having a well-planned itinerary for exploring a new destination.
Mastering the Roll: Technique and Tips

The act of rolling sushi is where the magic happens. It’s a skill that improves with practice, but by following these steps, you can achieve impressive results from your first attempt. The key is patience and a gentle yet firm hand.
The Essential Tools and Setup
Before you begin rolling, ensure you have the necessary tools laid out and ready. A clean, uncluttered workspace is essential.
- Bamboo Rolling Mat (Makisu): This is your primary tool. It’s a mat made of bamboo slats tied together with string. It provides the structure and pressure needed to roll the sushi tightly. You can find these at most Asian supermarkets or online.
- Plastic Wrap: While not always necessary, covering your bamboo mat with plastic wrap can prevent rice from sticking and make cleanup significantly easier. This is especially helpful for beginners.
- Bowl of Water with a Splash of Vinegar (Tezu): This is for dipping your hands to prevent the sticky rice from clinging to them. The vinegar helps kill bacteria and adds a subtle flavor.
- Sharp Knife: A very sharp knife is crucial for slicing the finished roll cleanly. A damp cloth for wiping the knife between cuts will also be helpful.
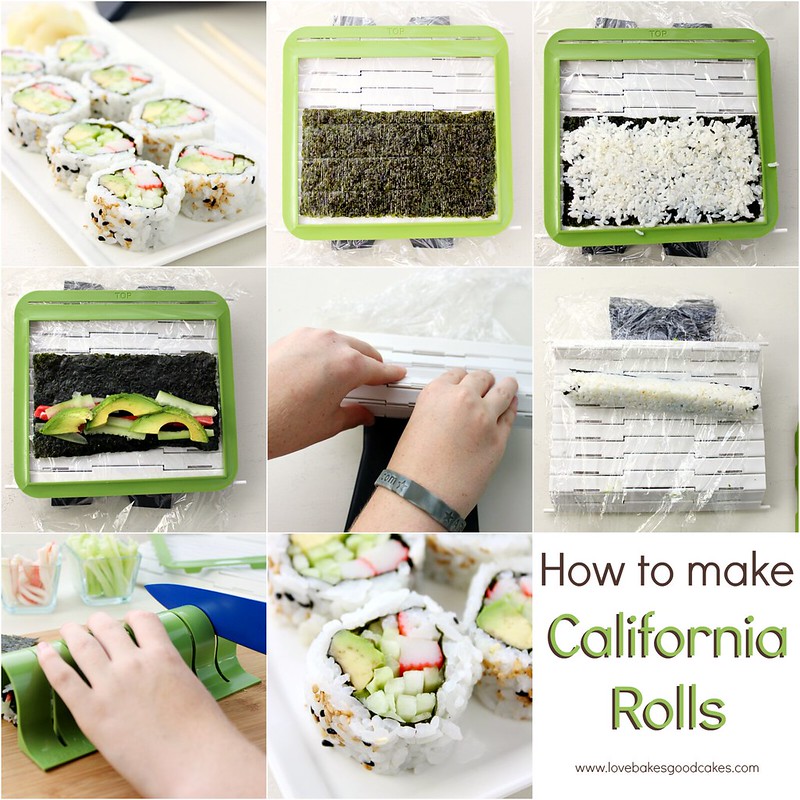
The Uramaki (Inside-Out) Roll Technique
The California Roll is typically an uramaki, meaning the rice is on the outside and the nori is on the inside. This is what gives it its distinctive appearance.
- Prepare the Mat: Lay your bamboo mat flat on your clean work surface. If using plastic wrap, cover the mat tightly with it, ensuring there are no wrinkles.
- Place the Nori: Place a sheet of nori, shiny side down, on the bamboo mat, with the longer side facing you.
- Spread the Rice: Dip your hands in the tezu (vinegar water) to prevent sticking. Take a portion of the seasoned sushi rice (about ½ to ¾ cup) and spread it evenly over the nori sheet, leaving about a ½-inch strip of nori bare along the top edge furthest from you. The rice should be spread thinly and evenly, without pressing too hard, creating a uniform layer.
- Optional Sesame Seeds: If you’re adding sesame seeds, sprinkle them evenly over the rice at this stage.
- Flip the Nori: Carefully lift the nori sheet with the rice and flip it over so the rice-covered side is now facing down on the bamboo mat. The bare strip of nori should be at the top.
- Add the Fillings: Arrange your fillings in a horizontal line across the bottom third of the nori sheet (closest to you). Place the crab meat, avocado strips, and cucumber strips in a neat row. Don’t overstuff the roll, as this will make it difficult to close.
- The Roll: This is the crucial step. Lift the edge of the bamboo mat closest to you, using your thumbs. Use your fingers to hold the fillings in place. Roll the mat forward, tucking the edge of the nori and fillings over to meet the rice. Apply gentle, even pressure to shape the roll. Continue rolling the mat forward, tucking and pressing as you go, until you reach the bare strip of nori.
- Seal the Roll: Moisten the bare strip of nori with a little water using your finger. Complete the roll, pressing gently to seal the edge.
- Shape the Roll: Once rolled, gently squeeze the entire roll within the bamboo mat to ensure it’s firm and uniformly shaped. You can shape it into a perfect cylinder or a slightly flattened rectangle.
Tips for Perfect Rolls
- Don’t Overstuff: This is a common mistake that leads to messy, falling-apart rolls. Less is more when it comes to fillings.
- Keep Your Hands Damp: Regularly dip your hands in the tezu to prevent the rice from sticking.
- Use a Sharp Knife: A dull knife will tear the nori and squash the roll. A sharp knife will slice through cleanly.
- Wipe Your Knife: After each cut, wipe your knife with a damp cloth to remove any residual rice or moisture. This ensures clean cuts every time.
- Practice Makes Perfect: Your first few rolls might not be perfect, and that’s completely fine! The more you practice, the more adept you will become.
Serving and Enjoying Your California Creations
Once your California Rolls are expertly rolled and sliced, the final step is to present them beautifully and savor the fruits of your labor. This often involves accompanying condiments that enhance the sushi experience, much like choosing the right hotel for your vacation enhances your travel experience.
The Classic Accompaniments
Traditional sushi is often served with a trio of accompaniments that provide complementary flavors and textures. These are essential for the full sushi dining experience.
- Soy Sauce: A good quality soy sauce is a must. It adds a salty, umami depth to the sushi. For a more authentic experience, consider a Japanese soy sauce.
- Wasabi: This pungent green paste, made from the wasabi plant, provides a sharp, sinus-clearing heat. Use it sparingly, as it can be quite potent. You can mix a small amount into your soy sauce or place a tiny dab directly on your sushi.
- Pickled Ginger (Gari): Thinly sliced pickled ginger, typically pink or pale yellow, is served as a palate cleanser. It helps to refresh your taste buds between different pieces of sushi, allowing you to appreciate the nuanced flavors of each bite.
Presentation is Key
How you serve your California Rolls can elevate the entire meal. Think of it as curating the perfect itinerary for your guests.
- Plating: Arrange the sliced rolls neatly on a platter or individual plates. You can fan them out, stack them artistically, or line them up.
- Garnishes: Consider adding a few decorative elements. Thinly sliced cucumber or avocado can be used as a garnish. A sprinkle of toasted sesame seeds on the rolls themselves adds visual appeal and a nutty flavor.
- Dipping Bowls: Provide small bowls for soy sauce. You can also offer small dishes for the wasabi and ginger.
Savoring the Experience
Enjoying your homemade California Rolls is the ultimate reward. Take a moment to appreciate the fresh ingredients, the textures, and the balanced flavors. This experience can be a delightful addition to a family trip or a sophisticated addition to a business stay.
Making sushi at home is more than just preparing food; it’s an immersive activity that connects you to culinary traditions and offers a tangible sense of accomplishment. Whether you’re relaxing in a boutique hotel or enjoying a staycation, the process of rolling California Rolls provides a fun, engaging, and delicious outcome. It’s a skill that opens doors to further exploration within the vast and fascinating world of Japanese cuisine, encouraging you to seek out authentic culinary experiences wherever your travels may take you. From the bustling markets of Tokyo to charming local eateries, the appreciation for well-prepared food will undoubtedly deepen after mastering this simple yet elegant dish.
LifeOutOfTheBox is a participant in the Amazon Services LLC Associates Program, an affiliate advertising program designed to provide a means for sites to earn advertising fees by advertising and linking to Amazon.com. Amazon, the Amazon logo, AmazonSupply, and the AmazonSupply logo are trademarks of Amazon.com, Inc. or its affiliates. As an Amazon Associate we earn affiliate commissions from qualifying purchases.