The allure of Hawaii extends far beyond its sun-drenched beaches and vibrant culture. For many, the islands evoke a sense of tropical paradise, a place where nature’s artistry is on full display. Among its most iconic symbols are its magnificent flowers, each a testament to the rich biodiversity and unique ecosystem of the Hawaiian archipelago. Learning to draw these floral wonders is not just an artistic endeavor; it’s a way to connect with the spirit of Aloha and capture a piece of the islands’ ephemeral beauty. This guide will walk you through the process of drawing a quintessential Hawaiian flower, focusing on a subject that embodies the essence of paradise: the hibiscus.

Understanding the Tropical Bloom
Before we put pencil to paper, it’s essential to appreciate the characteristics that make Hawaiian flowers so distinctive. The islands’ volcanic origins, isolation, and diverse microclimates have fostered an astonishing array of endemic species, many of which are found nowhere else on Earth. While the hibiscus is perhaps the most globally recognized, Hawaii boasts a stunning variety, including the delicate plumeria, the fiery ohia lehua, and the rare silversword.
The Hibiscus: A Symbol of Hawaii
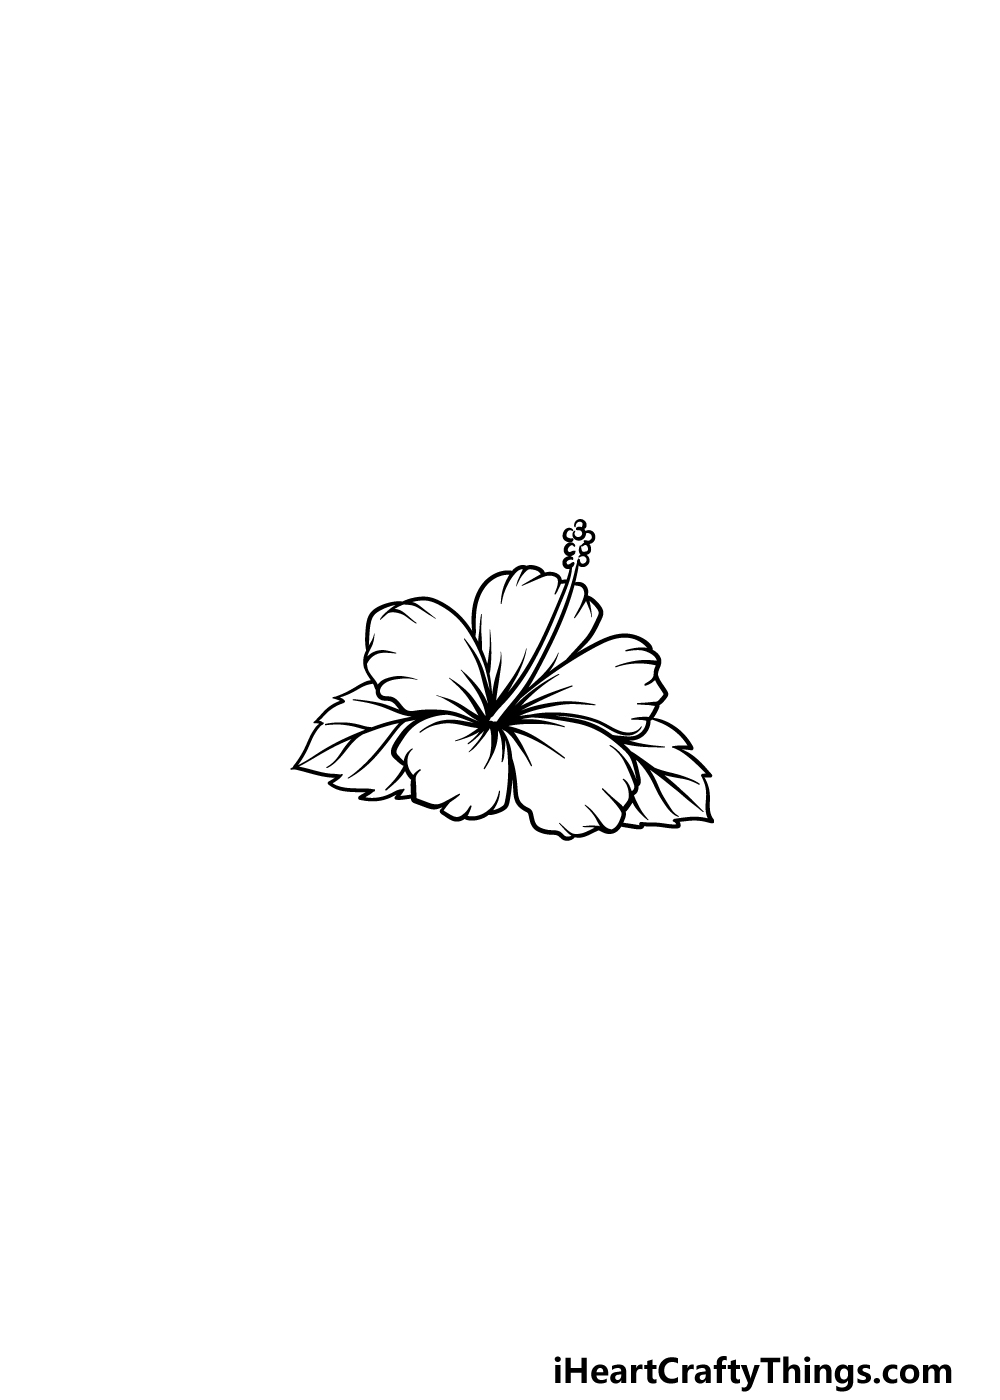
The Hibiscus rosa-sinensis, commonly known as the Chinese hibiscus, is the unofficial floral emblem of Hawaii and is often what people envision when they think of a “Hawaii flower.” It’s not native to the islands, but it has been cultivated there for centuries and has become deeply integrated into Hawaiian culture and aesthetics. These flowers are known for their large, trumpet-shaped blooms, often featuring five delicate petals that can range in color from vibrant reds and oranges to soft pinks, yellows, and whites. Many varieties also exhibit unique markings and petal formations, adding to their visual appeal.
Key Features to Capture
When drawing a hibiscus, consider its fundamental structure:
- Petals: Typically broad and slightly wavy or ruffled, with a distinct veining pattern that radiates from the center. The edges can be smooth or subtly serrated.
- Stamen and Pistil: This central reproductive part is a prominent feature, often a contrasting color and extending beyond the petals. It’s a long, slender column with small, pollen-dusted anthers at the tip and a stigma at its apex.
- Sepals: These are the green, leaf-like structures that cup the base of the flower. They are usually pointed and form a protective layer.
- Leaves: The leaves of the hibiscus are typically ovate or lance-shaped with serrated edges, adding context and depth to the floral subject.
Step-by-Step Drawing Process
Embarking on the drawing journey requires a methodical approach, starting with foundational shapes and gradually building detail. For this guide, we will focus on drawing a classic red hibiscus.
Phase 1: Sketching the Basic Form
Begin by lightly sketching the overall shape of the flower. Think of it as building a simple framework upon which you will layer detail.
- Center Point: Lightly mark the center of your drawing area. This will serve as the focal point for the stamen and pistil.
- Petal Placement: Draw a central circle or oval around your center point. This represents the very heart of the flower. From this central area, sketch five equidistant guidelines radiating outwards, like spokes on a wheel. These will help you position the petals.
- Outline the Petals: Using the radiating guidelines as a guide, begin to sketch the shape of each petal. Don’t aim for perfection at this stage; focus on capturing the general form. Most hibiscus petals are wider at their tips and taper towards the base. Draw them as broad, curved shapes that overlap slightly. Think of slightly irregular heart shapes or gently flared bells.
- The Stamen and Pistil: From the central circle, draw a long, slender stem-like structure extending upwards, often slightly curved. At its tip, draw a cluster of smaller, thin lines representing the anthers, which are often a different color (e.g., yellow or dark red) and may be tipped with tiny dots of pollen.
- Sepals: At the base of the flower, below where the petals emerge, sketch the sepals. These are typically pointed, somewhat triangular or leaf-like structures that cradle the bloom. Draw about five of them, fanning out slightly.
Phase 2: Refining the Details
Once the basic structure is in place, it’s time to add the finer elements that bring the drawing to life.
- Petal Edges and Veins: Now, refine the outlines of your petals. Give them a more organic feel by introducing gentle curves and slight undulations along the edges. Remember that real flowers are not perfectly symmetrical. Next, draw subtle vein lines radiating from the base of each petal towards its edge. These lines should follow the natural curvature of the petal and are usually lighter than the main outline.
- Stamen and Pistil Nuances: Enhance the stamen. The central column should be clearly defined, and the anthers at its tip can be drawn as small, rounded clusters. If you’re aiming for realism, observe how the anthers are attached and add subtle texture.
- Leaf Structure (Optional but Recommended): If you choose to include leaves, sketch their typical ovate or lanceolate shape with serrated edges. Add a central vein and some secondary veins radiating outwards. Ensure the leaves appear to be a natural part of the plant, perhaps emerging from the stem below the bloom.
- Adding Depth: Consider the overlapping nature of the petals. Erase any lines that should be hidden by an overlapping petal and reinforce the outlines of the visible edges. This creates a sense of three-dimensionality.
Phase 3: Shading and Color (Optional)
While the pencil sketch is complete, adding shading or color will elevate your drawing.
- Shading: Use your pencil to create shadows and highlights. Darken the areas where petals overlap, the base of the flower where the sepals meet, and along the deeper folds or curves of the petals. Use lighter strokes for areas where light hits directly. A soft graphite pencil is ideal for this, allowing for subtle transitions.
- Coloring: If you are using colored pencils, markers, or paints, begin with a base color and gradually build up layers for depth. For a red hibiscus, start with a lighter red and add darker reds or even a touch of purple for shadows. Yellows and oranges can be used for highlights and the stamen. Green is, of course, for the sepals and leaves. Remember to observe real hibiscus flowers or reference photos for accurate color placement and intensity.
Capturing the Essence of Hawaiian Flora
Drawing a Hawaiian flower, particularly the hibiscus, is an exercise in observing and translating natural beauty onto paper. It’s a process that encourages patience and attention to detail, much like the slow, deliberate growth of the islands themselves.
The Spiritual Connection
The flora of Hawaii is deeply intertwined with the islands’ spiritual and cultural heritage. Each bloom tells a story, from the legendary ‘ohi’a lehua, said to represent the love between Pele, the goddess of volcanoes, and her mortal lover, to the fragrant plumeria, often used in leis as a symbol of friendship and welcome. By learning to draw these flowers, artists can gain a deeper appreciation for the natural world that inspires so much of Hawaiian art and tradition.
Beyond the Hibiscus
While the hibiscus serves as an excellent introduction, the diverse floral landscape of Hawaii offers endless inspiration for artists. Consider exploring:
- Plumeria: Known for its sweet fragrance and delicate, often waxy petals, the plumeria is another popular subject. Its simpler form, with five distinct petals that don’t typically overlap as much as the hibiscus, can be a good subject for beginners.
- Ginger Flowers: These exotic blooms offer striking architectural forms and vibrant colors, ranging from fiery reds and oranges to soft pinks and whites. Their layered structure can present a fascinating challenge for drawing.
- Orchids: While many orchids are not native, Hawaii has developed a thriving orchid culture, with many unique hybrids and species cultivated across the islands. Their intricate shapes and delicate textures offer a rich subject for detailed rendering.

Tips for Observation and Practice
To truly master drawing Hawaiian flowers, embrace these practices:
- Observe Real Flowers: Whenever possible, study actual Hawaiian flowers. Pay attention to their textures, the way light falls on them, their subtle color variations, and their three-dimensional form. If you can’t find them locally, high-quality photographs are an invaluable resource.
- Sketch from Life: If you are fortunate enough to visit Hawaii, make time to sketch the flowers directly from nature. This direct observation is unparalleled for understanding form and light.
- Study Botanical Illustrations: Look at existing botanical drawings and paintings. These often emphasize accurate botanical details and can provide insights into effective rendering techniques.
- Practice Different Mediums: Experiment with pencils, charcoal, pastels, watercolors, or oils. Each medium offers unique ways to capture the translucency of petals, the sheen of leaves, and the vibrant hues of tropical blooms.
- Focus on Form and Light: Whether you are sketching a simple outline or a fully rendered masterpiece, understanding how light interacts with the three-dimensional form of the flower is crucial for creating a convincing and beautiful drawing.
Drawing a Hawaiian flower is more than just an artistic exercise; it’s an invitation to engage with the rich natural heritage and vibrant spirit of the islands. By following these steps and continuing to practice, you can create beautiful renderings that evoke the tropical paradise of Hawaii, one petal at a time.
LifeOutOfTheBox is a participant in the Amazon Services LLC Associates Program, an affiliate advertising program designed to provide a means for sites to earn advertising fees by advertising and linking to Amazon.com. Amazon, the Amazon logo, AmazonSupply, and the AmazonSupply logo are trademarks of Amazon.com, Inc. or its affiliates. As an Amazon Associate we earn affiliate commissions from qualifying purchases.