
Securing a passport is an essential step for any Californian dreaming of international adventures. Whether you’re planning a serene escape to the beaches of Hawaii, a cultural immersion in Europe, or a business trip to Asia, a valid passport is your key to unlocking the world. The process in California, while straightforward, requires careful attention to detail to ensure a smooth application. This guide will walk you through every step, from determining your eligibility to submitting your application and receiving your official travel document.
Understanding Passport Requirements and Types
Before embarking on the application journey, it’s crucial to understand the different types of passports available and the general eligibility criteria. The United States Department of State issues passports, and the requirements are consistent nationwide, including in California.
Eligibility for a U.S. Passport
To be eligible for a U.S. passport, you must be a U.S. citizen or a non-citizen national. This includes:
- Born U.S. Citizens: Individuals born in the United States or born abroad to U.S. citizen parents.
- Naturalized U.S. Citizens: Individuals who have gone through the naturalization process.
You will need to provide proof of your U.S. citizenship, which can include an original or certified copy of your birth certificate, a previous U.S. passport, a Consular Report of Birth Abroad, or a Certificate of Naturalization/Citizenship.
Types of Passports
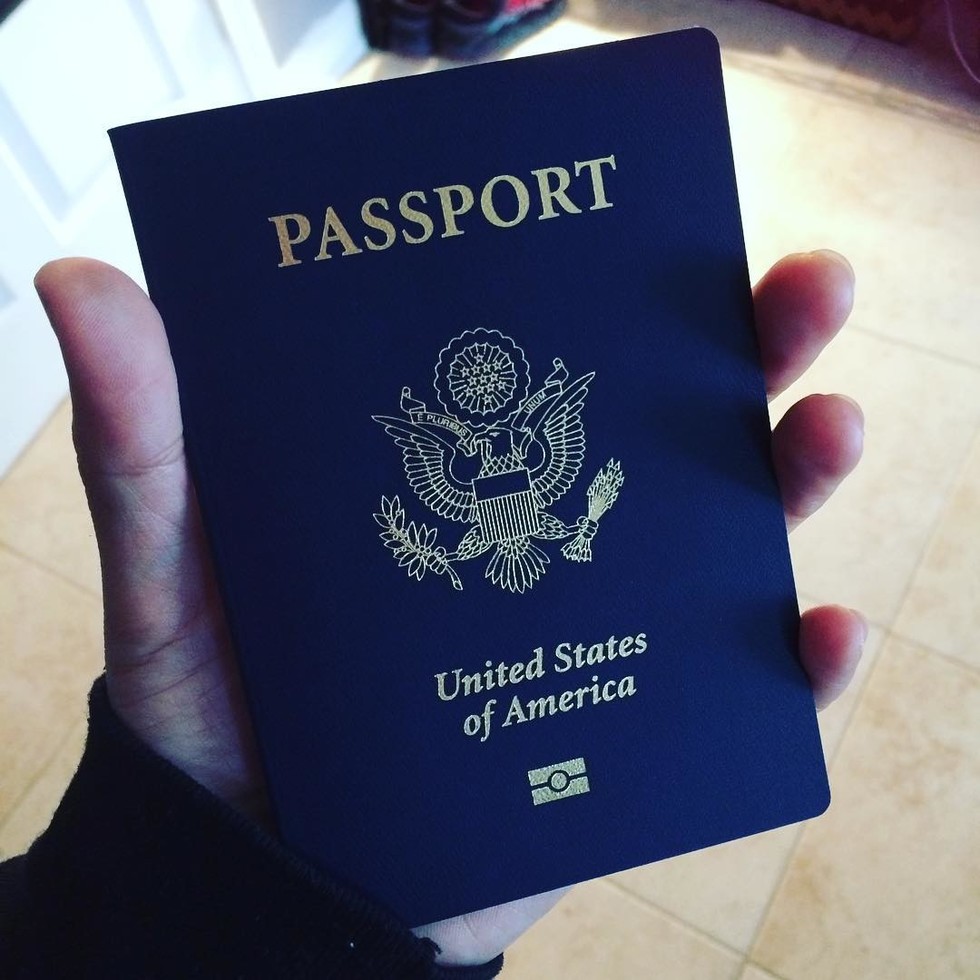
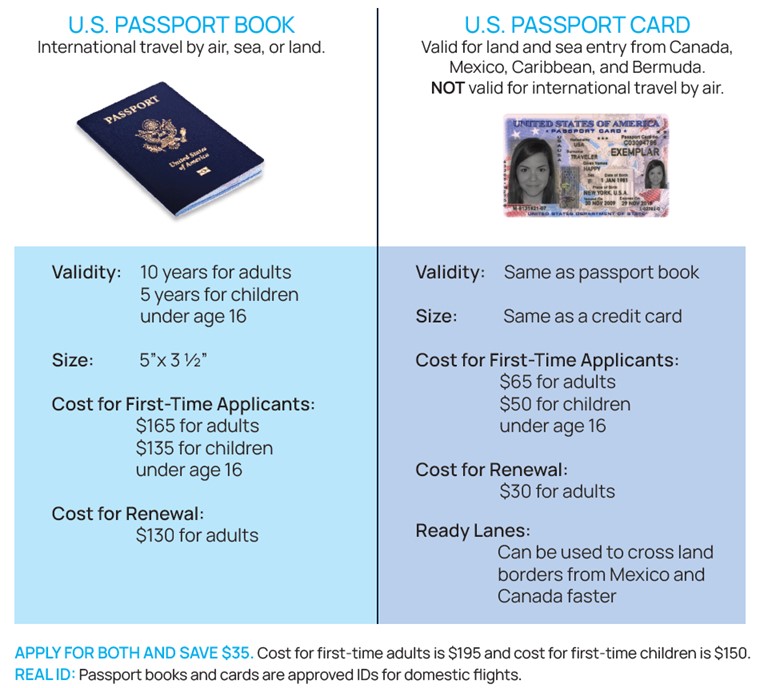
The most common passport issued is the U.S. Passport Book. This is the standard document required for all international air travel. If you plan on traveling by sea or land to certain neighboring countries like Canada or Mexico, a Passport Card may suffice, but it cannot be used for international air travel. For this guide, we will focus primarily on obtaining the U.S. Passport Book, as it is the most universally accepted form of international identification.
The Passport Application Process in California
The application process involves several key stages, from gathering necessary documents to attending an appointment. Californians can utilize various facilities across the state to submit their applications.
Step 1: Complete the Application Form
The primary document you’ll need is Form DS-11, “Application for a U.S. Passport.” This form is available for download from the U.S. Department of State’s website or can be obtained at any passport acceptance facility.
- Fill Out Accurately: Use black ink and print clearly. Do not sign the form until instructed to do so by a passport acceptance agent.
- Online Form Filler: The Department of State offers an online form filler that can help you complete the DS-11 accurately and print it. This is highly recommended to avoid errors.
- Critical Information: Ensure all personal details, including your full legal name, date of birth, place of birth, and Social Security number, are correct.
Step 2: Provide Proof of U.S. Citizenship
As mentioned, you must present evidence of your U.S. citizenship. This evidence must be an original or certified copy, and it will be mailed with your application and returned to you separately. Photocopies are generally not accepted.
- Acceptable Documents:
- U.S. Birth Certificate (meeting specific requirements: issued by the city, county, or state of birth; lists your full name, date and place of birth; lists parent(s)’ full names; has the signature of the city, county, or state registrar; has the date filed with the registrar’s office; has the seal of the issuing authority).
- Consular Report of Birth Abroad or Certification of Birth.
- Certificate of Naturalization.
- Certificate of Citizenship.
- A previous, undamaged U.S. Passport (even if expired).
Step 3: Present Proof of Identity
You will also need to present a valid form of identification. This document proves that you are who you claim to be.
-
Acceptable Identification:
- Valid Driver’s License (not temporary or learner’s permit).
- State-issued Identification Card.
- Military Identification Card.
- Government Employee Identification Card (city, state, or federal).
- U.S. Passport (valid or expired).
- Certificate of Naturalization or Citizenship.
- Valid Foreign Passport.
-
Photocopy of ID: You must also submit a clear, black-and-white photocopy of the front and back of the identification document you present.
Step 4: Obtain a Passport Photo
Passport photos have very specific requirements to ensure they are suitable for identification. Failure to meet these requirements can lead to application delays.
-
Photo Specifications:
- Taken within the last six months.
- 2×2 inches in size.
- Color photo.
- Plain white or off-white background.
- Neutral facial expression or a natural smile with both eyes open.
- No glasses (unless medically necessary with a doctor’s statement).
- No hats or head coverings (unless for religious or medical reasons with a signed statement).
- Your full face must be visible.
-
Where to Get Photos: Many pharmacies (like CVS or Walgreens), shipping centers (like FedEx or UPS), and dedicated passport photo services in California offer compliant passport photos.
Step 5: Calculate and Prepare Fees
Passport fees are set by the U.S. Department of State and are subject to change. There are two main fees:
-
Application Fee: This fee is paid directly to the U.S. Department of State.
-
Execution Fee (Acceptance Fee): This fee is paid to the facility where you submit your application.
-
Payment Methods:
- The application fee must be paid by check or money order payable to the “U.S. Department of State.”
- The execution fee can typically be paid by check, money order, or sometimes by credit card, depending on the facility. Always check with your chosen acceptance facility beforehand.
-
Current Fees: As of late 2023, the application fee for a U.S. Passport Book is $130, and the execution fee is $35. These amounts are subject to change, so it’s vital to check the official U.S. Department of State website for the most up-to-date fee schedule.
Step 6: Schedule and Attend an Appointment at a Passport Acceptance Facility
In California, most passport applications must be submitted in person at an official Passport Acceptance Facility. These are typically post offices, libraries, or county clerk offices designated by the Department of State.
-
Finding a Facility: You can find a nearby acceptance facility using the U.S. Department of State’s online locator tool. Popular choices in California include many branches of the United States Postal Service, such as those in Los Angeles, San Diego, and San Francisco.
-
Appointment Necessity: Most facilities require appointments. It is essential to schedule yours in advance, as waiting times can be significant, especially during peak travel seasons.
-
What to Bring: On the day of your appointment, bring:
- Your completed, unsigned DS-11 form.
- Your original proof of citizenship.
- Your valid proof of identity.
- A photocopy of your proof of identity.
- Your passport photo.
- Payment for the fees (separate payments for application and execution fees).
-
During the Appointment: The acceptance agent will review your documents, verify your identity, witness you signing the DS-11 form, and collect your application package and fees. They will then seal and mail your application to the appropriate processing center.
Expedited Passport Services
If you need your passport quickly, the U.S. Department of State offers expedited processing.
Standard vs. Expedited Processing Times
- Routine Processing: Typically takes 6-8 weeks.
- Expedited Processing: Typically takes 2-3 weeks.
These times are estimates and can fluctuate based on demand.
How to Expedite Your Application
- Mark as Expedited: When filling out your DS-11, indicate that you are requesting expedited service.
- Pay Expedited Fee: There is an additional fee for expedited processing, which is currently $60 per application. This is paid to the U.S. Department of State.
- Use Priority Mail: Sending your application via USPS Priority Mail Express for both outbound and return delivery can further speed up the process, though this is an additional cost.
- Urgent Travel: If you have urgent travel plans (within 14 days) or need a passport for a foreign government emergency, you may be eligible to make an appointment at a Regional Passport Agency. These appointments are limited and require proof of urgent travel. Californians can find these agencies, often located in major metropolitan areas.
Renewing Your Passport
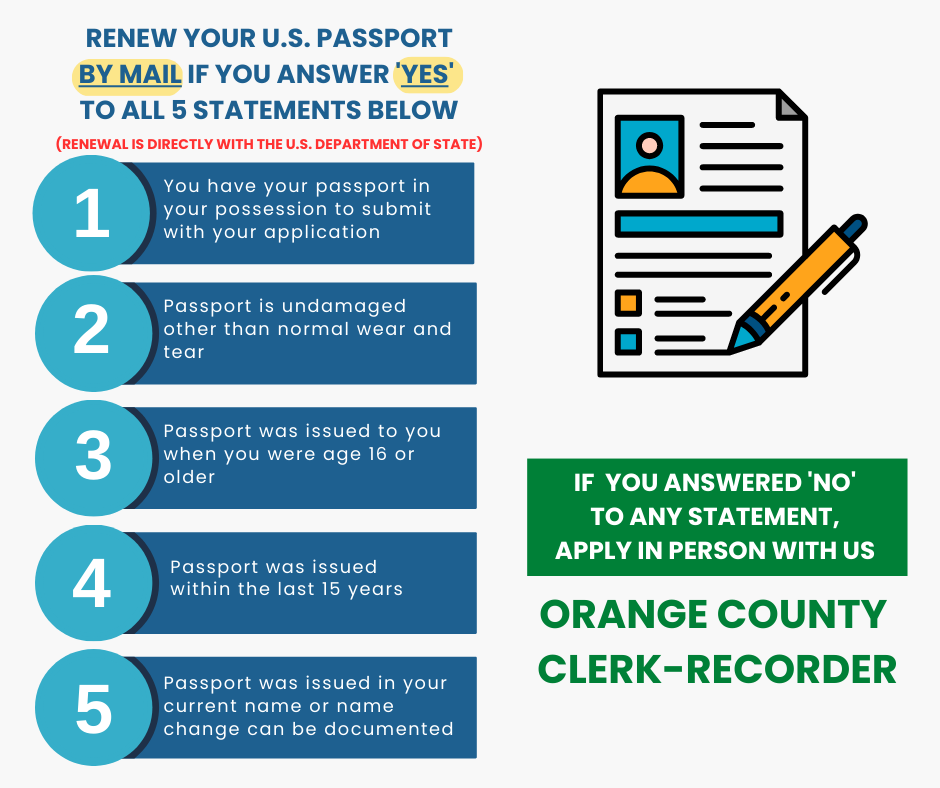
If your current passport is expired or will expire within the next six months, you’ll likely need to renew it. The renewal process is generally simpler than applying for a new passport, provided you meet certain criteria.
Eligibility for Renewal by Mail
You can renew your passport by mail using Form DS-82 if all of the following apply:
- You have your most recent passport in your possession, and it is undamaged (other than normal wear and tear).
- It was issued when you were age 16 or older.
- It was issued within the past 15 years.
- It was issued in your current name, or you can document your name change with an original or certified copy of your marriage certificate or court order.
The Renewal Process
- Complete Form DS-82: Fill out the “U.S. Passport Renewal Application” form.
- Submit Your Current Passport: Mail your most recent passport along with the completed form.
- Provide a New Photo: Include one compliant passport photo.
- Payment: Pay the renewal fee by check or money order. The current renewal fee for a passport book is $130.
- Mail Your Application: Send your complete package to the address listed on the DS-82 form. It’s recommended to use a trackable mailing service.
Renewal by mail typically takes the same amount of time as routine processing for new applications. If you do not meet the criteria for renewal by mail, you will need to apply in person using Form DS-11, as if you were applying for a first-time passport.
Tips for a Smooth Passport Application Experience
Navigating the passport application process can feel daunting, but with a little preparation, it can be a seamless experience.
- Start Early: Don’t wait until the last minute to begin your passport application. Processing times can be unpredictable, and it’s always better to have your passport well in advance of your travel dates.
- Double-Check Documents: Carefully review all forms and documents for accuracy and completeness before submitting them. Errors are the most common cause of delays.
- Use the Official Website: Always refer to the U.S. Department of State’s official travel website for the most current forms, fees, and requirements.
- Consider Passport Seva Kendras (PSK): While not directly applicable in California as they are in other countries, the concept of dedicated service centers highlights the importance of organized application submission. In California, this translates to using designated Passport Acceptance Facilities efficiently.
- Keep Copies: Make copies of all documents you submit, including your application form, proof of citizenship, and identification. Store them separately from the originals.
By following these steps and recommendations, Californians can confidently navigate the process of obtaining or renewing their U.S. passport, paving the way for exciting international travel experiences. Whether your next destination is the vibrant streets of Paris, the ancient wonders of Rome, or a well-deserved relaxation at a resort in the Caribbean, your passport is the first step towards making those dreams a reality.
LifeOutOfTheBox is a participant in the Amazon Services LLC Associates Program, an affiliate advertising program designed to provide a means for sites to earn advertising fees by advertising and linking to Amazon.com. Amazon, the Amazon logo, AmazonSupply, and the AmazonSupply logo are trademarks of Amazon.com, Inc. or its affiliates. As an Amazon Associate we earn affiliate commissions from qualifying purchases.